|
Whether your blog is brand new or already established, you can never have enough traffic. Seriously… I work at an SaaS company called Ahrefs, and even though the Ahrefs blog pulls in over 200k organic traffic every month, we still experiment with ways to promote our blog and bring in more traffic. Because let’s face it: It’s 2019. Simply sending an email blast to your subscriber list doesn’t cut it anymore. But don’t fret. If you’re stuck coming up with new ideas for how to promote your blog, here are 9 tried-and-tested tactics that have worked for us. Let’s dig in. #1. Work with PodcastsLet’s start things off with the buzzword of the year: podcasts. Thanks to their flexibility (you can listen to them while you’re at work or when you’re on the go), they’re the most popular form of audio content. They’re also widely available on services like iTunes, Google Play, and Spotify. Some quick facts:
Ahrefs has had great success with sponsoring podcasts (paid advertising) as well as guesting on them — that is, sending a member of our team to be interviewed on a show. Here’s an actual comment from a new customer and blog reader of ours:
For sponsoring podcasts, think of this tactic as a type of influencer marketing. Your job is to sell your blog to the podcast host and the podcast host’s job is, in turn, to sell your blog to their audience. How to Promote Your Blog by Sponsoring PodcastsIf you have the budget, sponsoring podcasts is a great way to promote your blog. Here’s how you do it: Step #1. Do Your ResearchCreate a list of podcasts whose audiences are a good match for your blog. If you have no idea where to start, here’s a tip: Try using a specialized podcast search engine like Listen Notes. Browse the shows and pick your favorites.
Step #2. Make ContactOnce you’ve created a list of targets, you’ll need to contact the podcasts and inquire about sponsorship details. What are their pricing packages? What dates do they have available? Are there any gotchas? Prices can range from $50 to $5,000 and beyond per episode, so work within your particular budget. Step #3. Iron Out the DetailsThis includes your ad copy, delivery, and any other deliverables like your blog’s logo and elevator pitch. In my experience, organic reads do much better than “scripted ads.” The goal is to get the podcast host to sound like a fan and regular reader of your blog. Step #4. Wait for Your Ad to AirIf anything is off, be sure to let the podcast know as soon as possible! How to Promote Your Blog with Podcast InterviewsIf you’re strapped for cash (or simply don’t want to do podcast advertising), another approach is to appear as a guest on podcasts. This is usually free — unless you’re approaching extremely-popular podcasts, which tend to charge a one-time appearance fee. The catch is you’ll need some kind of credibility to your name. In other words, you’ll need to convince the podcast host that you’re someone their audience would love to listen to. The process for this is similar to the one detailed above: Step #1. Create a Target ListUse Listen Notes or a similar tool to create a list of podcast targets. Step #2. Check if They Accept InterviewsOften, podcasts will explicitly state on their websites whether or not they accept interview requests. And if they don’t accept interview requests? Ask anyway. Send in your pitch and convince them you have lots of value to add. Step #3. Follow the Host’s LeadEvery podcast will have their own process. Some may want to do pre-interviews, some may want to work on a rough content online with you, and some may want to just “wing it.” Whatever the process, remember to be courteous and respectful — you’re a guest, after all. Just don’t forget to mention your blog! Editor’s Note:Appearing on podcasts is one of our favorite promotion strategies here at Smart Blogger — as evidenced by our appearances on EOFire, James Altucher, Duct Tape Marketing, the Write Podcast, and Loz James’ Content Champion. Just make sure you’re prepared:
#2. Republishing on MediumSure, you can publish tons of absolutely amazing posts on your own blog. But if you never extend your reach, whether it’s by growing your list of email subscribers or boosting your number of social media followers, your audience will be limited. So what do you do if you don’t have time to create promotional content and extend your reach? Try this: Republish your existing posts on blogging platforms like Medium. Your content will be seen by a whole new audience — some of which will then visit your blog and discover all the great content you have to offer. For example, look at this blog post I published on the Ahrefs blog last December:
It got 463 shares and 43 comments — very decent engagement considering the fact that the topic likely didn’t appeal to our blog’s core audience (people interested in search engine optimization). In a bid to push the post out to a wider audience, we republished it on Medium. It turned out to be a fantastic decision. Here are the stats as of March this year:
That’s 13.6k views in total, with 22% of readers actually finishing the whole post. Plus, the Medium publication of this post averages a steady trickle of 10-30 readers every day.
Note: For the SEO-conscious among us, Medium uses canonical tags when you use their republishing tool. So no worries about duplicate content issues.
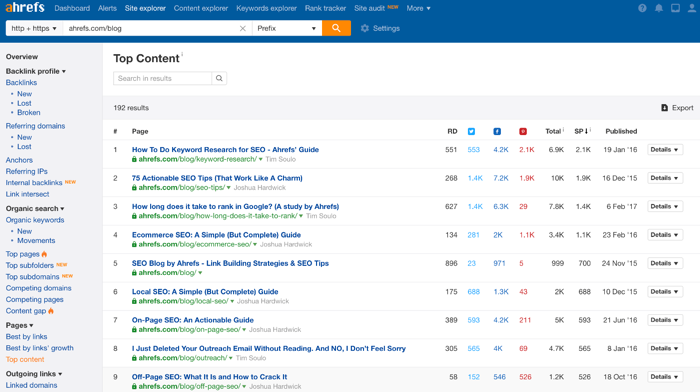
How to Republish on MediumMedium has made the process of importing and republishing content super simple. Here’s how you do it: Step #1. Choose a Post to RepublishIdeally, pick one of your top performers (since it’s already proved it’s popular). You can use a tool like Ahrefs’ Top Content report in Site Explorer to see which of your posts have the most shares on social media.
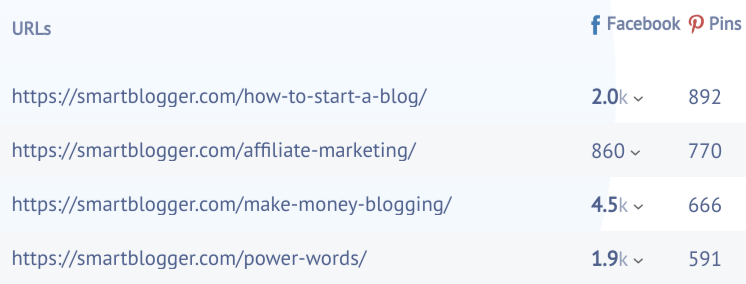
Since they’ve proven themselves on social media, these posts are the most likely to resonate with audiences beyond your blog’s existing one. Editor’s Note:Though they aren’t nearly as detailed, there are a few free tools to track social media shares if you aren’t an Ahrefs customer. As an example, SharedCount.com lets you copy and paste URLs of individual posts; however, they only show counts for Facebook and Pinterest:
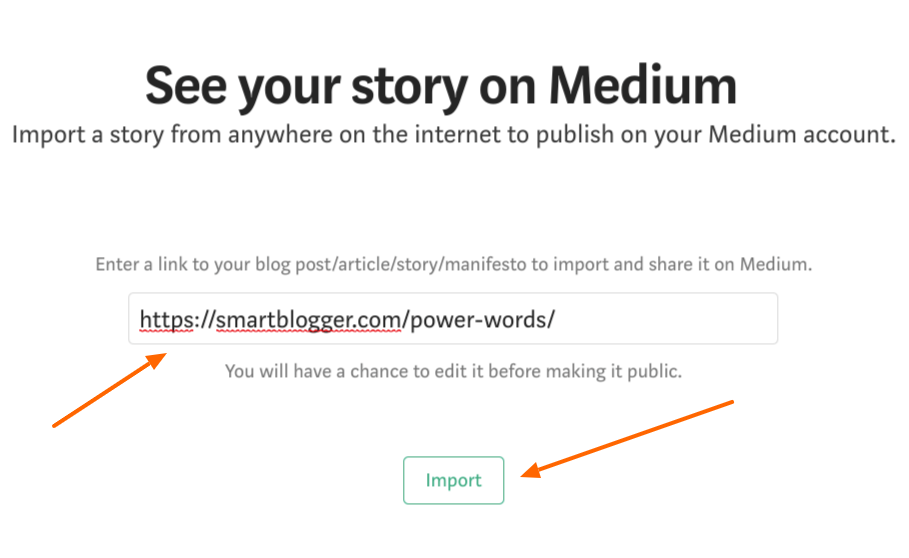
Step #2. Import Your Post Into MediumEnter the URL of your post into the Medium import tool and hit “Import”.
Step #3. Publish Your Post on MediumFollow Medium’s guidelines to format and polish your post, then click “Publish”.
That’s all there is to it! #3. Smart Social SharingI know, I know. It’s 2019, and promoting your blog posts on social media is by no means a new strategy. BUT — there’s more to social media promotion than pasting a link and clicking a “Tweet” button. Here’s an example of the success we’ve seen from smart sharing on the Ahrefs Twitter account:
Pretty impressive, right? Here’s another example:
These tweets received amazing engagement, but we actually spent very little time creating them. We achieved this ROI by working smarter, not harder. How to Promote Your Blog Using Social Media (Smartly)Here’s our process: Step #1. Brainstorm Ideas and Organize ThemThe great thing about social media content is it’s all fleeting. Even if an idea is a flop, it’s easy to turn the page and try the next idea. But to make the most of these (admittedly fleeting) opportunities, you need two things:
To brainstorm ideas, get a pen and paper (or launch Google Docs, Microsoft Word, etc.) and jot down things you would like to try. Get as creative as you want. Think memes would be popular with your audience? Write it down. Believe infographics or inspirational quotes could be successful? Write them down. Believe posts or tweets on Topic X or Topic Y could receive high engagement? (You get the idea.) By listing all of your ideas, you’ll then be able to group them into categories. This will help you track which categories are successful and which are not. Step #2. Craft and Publish (and Monitor) Your ContentYou can use social media management tools like Buffer and MeetEdgar to schedule your content and keep it running automatically. Once your social media posts begin making their way into the wild, you’ll be able to track their progress. Do some receive more comments, while others receive more shares and retweets? Are some more popular in the mornings, while others receive more engagement during the evenings? All data, both good and bad, will help you in the next step. Step #3. Review the ResultsAfter an appropriate amount of time has gone by, hold a review. Drop the categories that didn’t perform well. Keep the ones with potential and refine them. You want to focus on the categories your audience likes and tweak them. Do they like emojis, or do they gravitate towards a more “serious” tone? Do they like infographics, or long chunks of copy with statistics thrown in? And so on. From here, keep repeating steps 1-3 until you’ve locked down the type of content your audience loves. And once you’ve figured out what they love, keep giving it to them. Step #4. Advertising (Optional)If you want to try advertising, the above process will save you some serious money. Pick your top organic performers from Step #3 and put money into promoting them. Since they’ve already proven themselves to be popular, this is a safe and effective way to buy ads to promote your blog (without wasting time and money on losers). #4. Create Roundup PostsThe perks of this strategy pretty much sell themselves. Here’s what happens when you publish a good roundup post:
So… what’s a roundup post, anyway? Here’s an example:
Essentially, a roundup post features a compilation of answers to a single question, ideally by established experts in the field. A great roundup post adds immense value to readers since they offer a range of expert opinions in one place. Plus, they tend to bring in lots of traffic since the experts featured in them will often share the post with their own audiences. What’s not to love? How to Create Roundup PostsHere are the basics of roundup posts so you can create your own: Step #1. Craft Your QuestionDon’t take this step lightly. If you ask too much of the experts you’ll be polling, most won’t have time to participate (even if they want to). And if you ask a question they’ve heard (and answered) a million times, most won’t be interested. Your question needs to be clear, succinct, and something that will appeal both to your readers and the experts you’ll be asking to participate. Step #2. Create a List of InfluencersOnce you’ve crafted your question, it’s time to create your influencer wish list. These are the influencers (“experts”) you’ll be asking to participate in your roundup post. Since not everyone will respond to you, reach out to significantly more experts than you need. For example, if you need 20 people for your roundup post, reach out to 40 experts (or more). Remember: A roundup post is only as good as the people you feature. While it takes exponentially more time and effort to get a response from a more recognized name in your industry, it’s likely worth it. With that said, don’t expect the Michael Jordans of your industry to respond to your outreach — try to find people with a reasonable level of influence who aren’t complete titans. Step #3. Reach Out to the ExpertsYou can use specialized tools like BuzzStream or Mailshake to streamline the entire outreach process by making it easier to hunt down email addresses, batch send messages, and conduct follow-ups.
Quick tips for the message you send:
Step #4. Follow Up (But Only Once)There’s a chance your first email will slip past the expert you’re trying to reach. After all, they’re very busy and likely receive dozens (or hundreds) of emails every single day. This is why sending a follow-up email is helpful:
However, please don’t follow-up more than once — any more than that and you’re just being a nuisance. Step #5. Compile Your ResponsesAt this point, you’ll have a bunch of answers ready to sift through. Now all you need to do is turn them into a cohesive post. Try to find trends in the responses and sort them into sections. Next, add your own introduction to each section, as well as your opinion on why certain trends occurred. This is how you put your stamp on the roundup post and make it your own. Step #6. Publish Your Post (And Tell the Experts)Once your post is published, it’s time to let everyone know about it. Email everyone who responded to your outreach emails (whether they ultimately contributed to your post or not) and thank them for their time. Include a link to your post, and be sure to send them well-wishes. You can also ask them (politely) to share your post with their audience, but this is often implied. Editor’s Note:Want to let influencers know your post has been published and promote the post at the same time? In addition to emailing them, tag the influencers on Twitter too.
#5. Advocate In-PersonWhile all blogs are digital in nature, your promotional efforts aren’t limited to the digital world alone. It might be a step (or ten!) outside your comfort zone, but try this: Approach a local event in your niche and pitch yourself as a speaker. It doesn’t matter where you are in the world or how big the event is — it could even be a small meet-up session. The idea is to reach out to new people and give the work you do a huge visibility boost.
How to Promote Your Blog by Speaking at EventsIf you’re interested in this advanced promotional tactic, here’s how to get started: Step #1. Shortlist a Few Events or Meet-Ups You’d Like to AttendIf you’re not sure where to start, look around on Reddit, Facebook groups, or Slack groups and join some communities in your industry. Chances are good people are organizing and promoting events in these communities. Make a list of potential targets, underline your favorites, and move on to the next step. Step #2. Pitch Yourself to Event OrganizersWhen pitching yourself, propose some topics that you’d be comfortable speaking about and explain how your content will add value to their audience. Hopefully it goes without saying, but you should know these topics very well.
Note: If you have no experience with public speaking, it’s a good idea to start small. Save the conference keynote speeches for later.
Step #3. Craft Your PresentationTry to deliver as much value as you can and position your blog as a great resource. This is also a good time to promote your social media accounts, which are ideally already geared towards driving traffic to your blog. Just be sure not to make it all about you. Your job is to teach, to impart your know-how to others. And when you’re able to do this well, promoting your blog will happen organically. Step #4. SpeakShow up to the event, deliver your speech, meet lots of new people, and enjoy converting some new readers! Editor’s Note:To improve your chances of landing speaking engagements, make sure you:
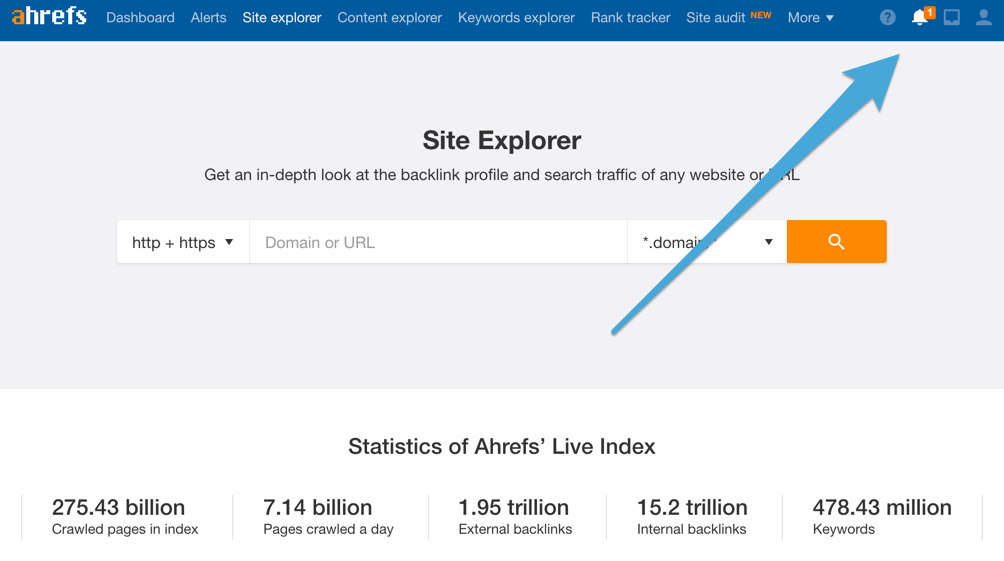
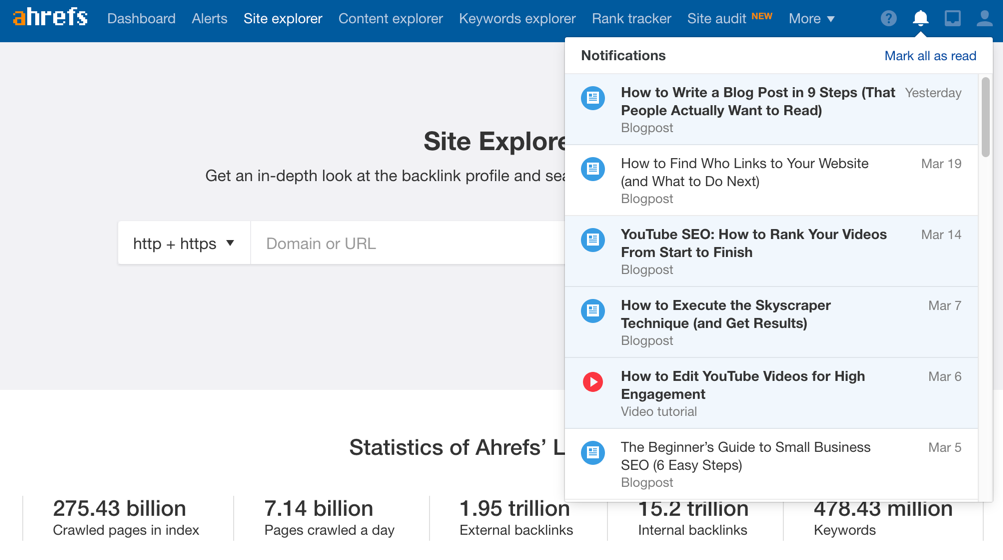
There’s a lot more to it than we can unpack here, so be sure to check out Grant Baldwin’s post How to Get Speaking Engagements. In fact, browse his entire website, The Speaker Lab. It’s chock-full of helpful information. #6. Integrate Your Blog with Your ProductMost businesses have blogs that are completely disconnected from their main product. If you blog for a brand or business, why not align your messaging and integrate your blog posts directly into your UI (for software products) or in your product descriptions and previews (for e-commerce)? This lets you direct traffic over to your blog and gives your customers a more seamless experience. How to Fuse Your Blog and ProductFor software products, one way to notify people of your newest blog posts is to include a (preferably unobtrusive) in-app notification. Here’s what it looks like when using Ahrefs:
Click the bell icon and we display a simple drop-down menu listing all our newest content.
So simple, but so effective. If you have an e-commerce website and your blog posts are educational in nature, you can promote them directly on your homepage. Beardbrand does this beautifully:
Another way to do this is by scattering in individual links and excerpts of your blog posts wherever they’re relevant. This is how Mr Porter does it:
Time to get creative! Editor’s Note:Here’s one more tip that’s missed by a surprising number of business websites… Include a prominent link to your blog in your website’s navigation menu. Ahrefs, MeetEdgar, Elegant Themes (affiliate link), and many other smart businesses feature their blogs in their navigation, which helps drive traffic to them. Here’s how Quuu (affiliate link) does it:
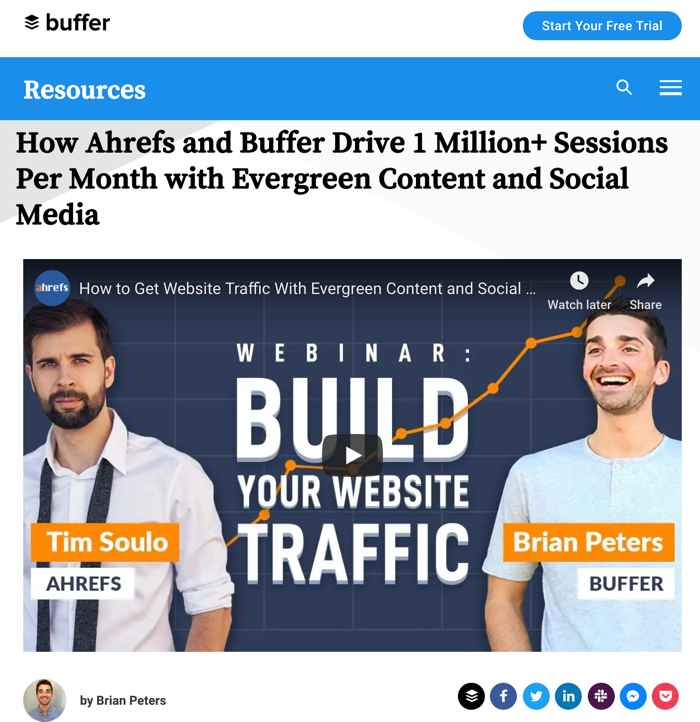
In other words: If people have to hunt to find your blog ON YOUR OWN WEBSITE, you're doing it wrong.Click To Tweet#7. Collaborate with Other BlogsCreating content in collaboration with another blog means you’re able to tap into each other’s audiences and can promote yourself to a whole new set of blog readers. You can even split the work! Here’s a post that Ahrefs did with Buffer, a social media management tool:
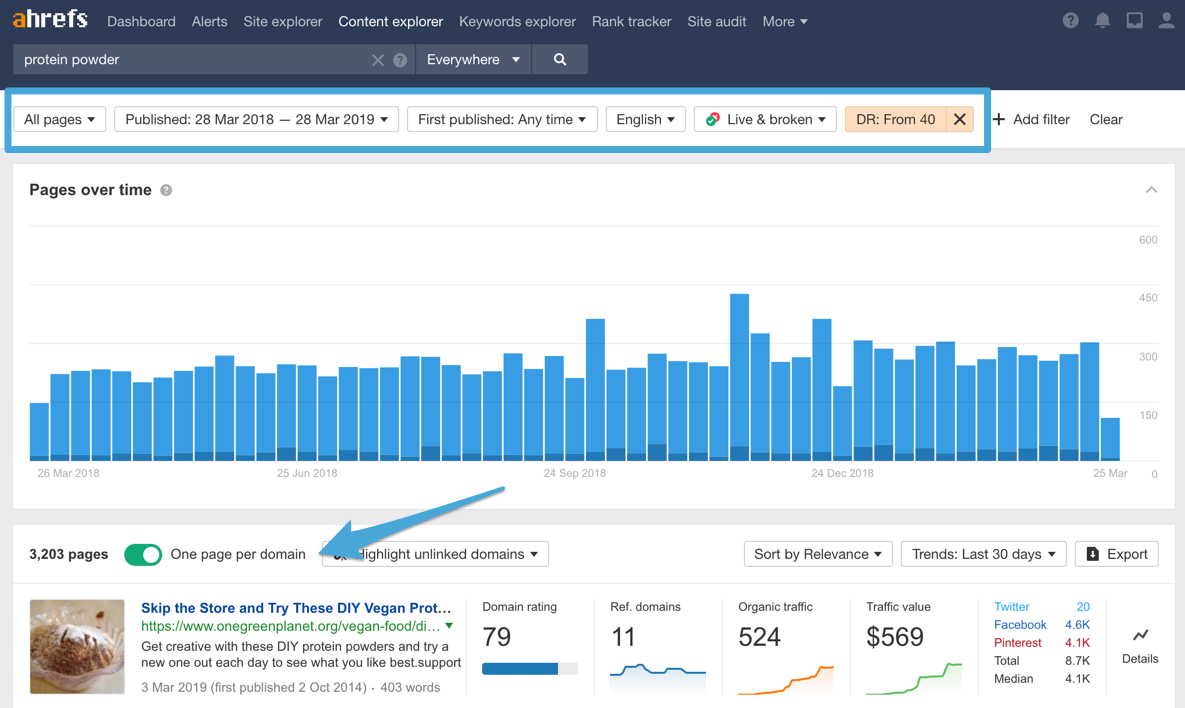
How to Join Forces With Another BlogFair warning: Collaborating with blogs significantly larger than yours probably isn’t in the cards. However, collaborating with a site similar in size is definitely doable. Here’s how to get started: Step #1. Find Opportunities in Your NicheLook for opportunities to work with blogs within the same niche as yours. Start by approaching bloggers you have an existing relationship with and ask if they’d like to collaborate. You should leave cold pitching as a last resort. If you have no idea which blogs to approach, Ahrefs offers a nifty trick: In Content Explorer, enter a relevant keyword phrase in your niche. Set the “published” filter to “Last 12 months” and the “Language” filter to “English”. Next, highlight the “one link per domain” option. Finally, you’ll want to set one more filter: DR (“domain rating”). The higher this number, the more authoritative the website; however, the more authoritative the website the harder it will be for you to get the blogger’s attention. In the screenshot below, we set the DR to 40:
This will pull a list of active blogs in your niche. From here, just sift through the possibilities and pick the ones you’d like to approach. Step #2. Make Your PitchThe process is pretty similar to advocating in-person: you need to make your best pitch. Focus on explaining why you want to work with that particular blogger, as well as how collaboration will benefit them. Feel free to suggest a couple of topics you feel would work well. Step #3. CreateCreation time! Finalize your content with the blogger you’re working with and remember to stay prompt and gracious throughout. This is not the time to get pushy or rude and make an enemy out of a would-be ally. Step #4. Publish and PromotePromote the post to your newsletter and social media accounts. Make sure to tag and give credit to the other blogger too. #8. Repurpose Content Into Other Formats to Reach New AudiencesYou’ve spent all this time and effort to create amazing content in the form of blog posts. Why not get more out of the same piece of content? Since your customers hang out in multiple places online and have their own preferences when it comes to content formats, you should try to reach audiences beyond blog readers. And you do that by repurposing your content.
How to Repurpose Your ContentSome examples:
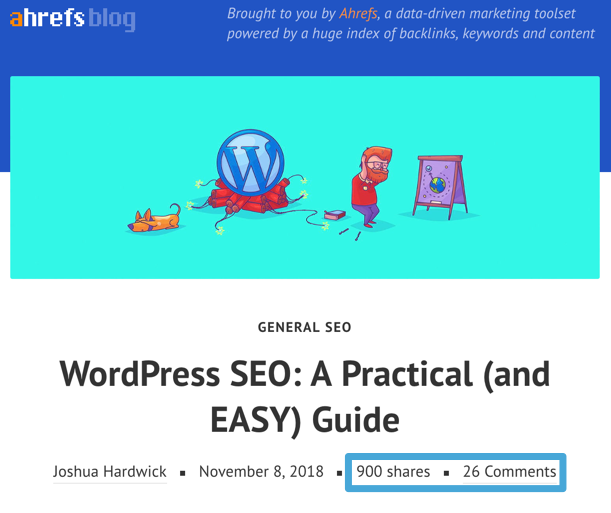
Or, do it in reverse. We published a YouTube tutorial on WordPress SEO. It has over 20,000 views and 70 comments — not too shabby. We decided to turn it into a blog post. Here’s how it performed:
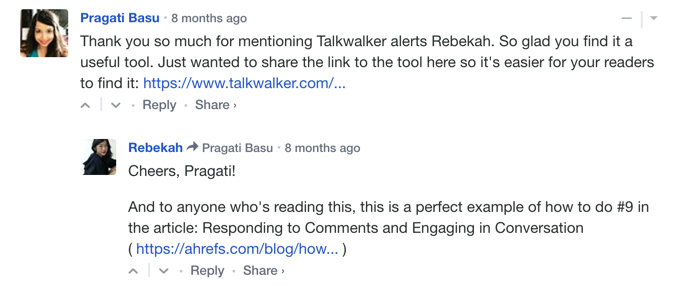
By re-creating our video in written form, we were able to reach an entirely new audience on an entirely different platform. And the best part? We didn’t have to come up with fresh content for the post. We took what we already had and created something new with it. #9. Monitor Online Conversations for Opportunities to Promote YourselfPeople talk about all sorts of things on the Internet, including your niche. If you monitor these conversations, you’ll get lots of chances to slide into the discussion, add value, and (subtly) promote your blog. Here’s a pretty meta example of this tactic in action. I once mentioned Talkwalker alerts in a blog post I wrote, and an employee commented on the post to provide the link:
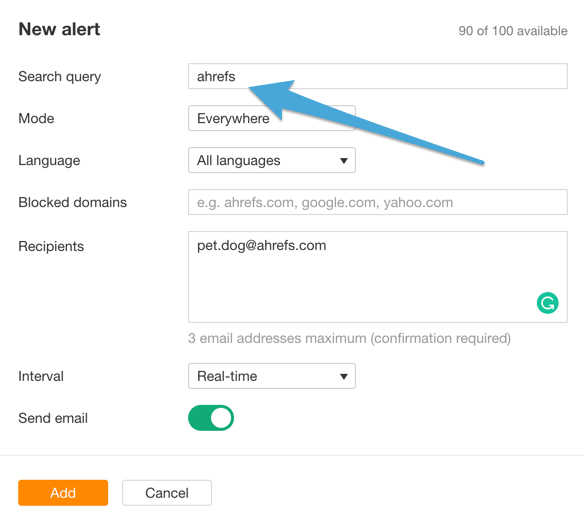
How to Monitor Conversations for Promotion OpportunitiesTracking online conversations is surprisingly easy. Here’s how you do it: Step #1. Set up Your AlertYou can use a free tool like Google Alerts, or services like Talkwalker Alerts and Ahrefs Alerts. For Ahrefs, go to Alerts, Mentions, +New Alert, and enter your keyword you’d like to track.
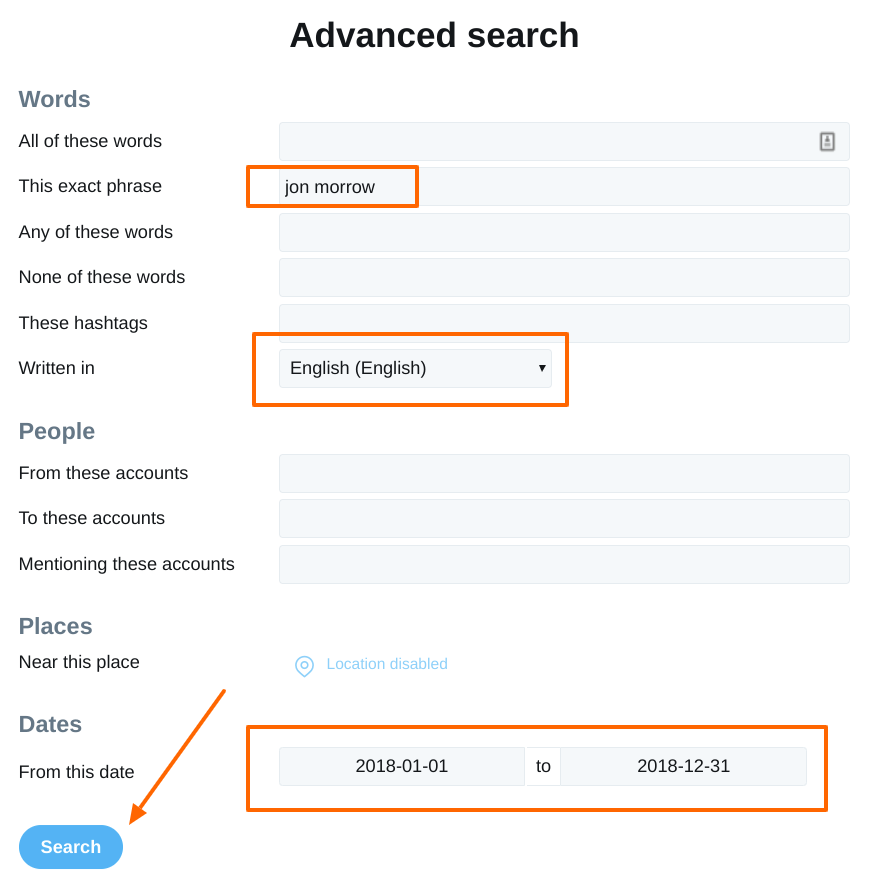
What these tools do is send you an email every time a keyword is mentioned on the web. From there, you can simply follow the link in the email to find out where you’ve been mentioned. Step #2. Carefully Monitor Your MentionsWhether your mention comes in a blog article or a forum discussion, look for suitable areas where you can add value. For example, if you’re a food blogger and you receive an alert for a discussion of a restaurant, it’s your time to shine by talking about your own experience. However, a word of warning: It’s extremely important not to shoehorn yourself into conversations. If you’re clearly only there to advertise your own blog, people will catch on pretty quickly. So, be sure to link to your own blog strategically, and only after you’d added value to the discussion. Editor’s Note:You can also track mentions using Twitter’s advanced search. For example, let’s say I wanted to find every English-speaking tweet in 2018 that mentioned Jon Morrow by name:
Twitter’s advanced search results would return a veritable smorgasbord of tweets:
Cool, right? Use this feature to find keywords and mentions that matter to you, roll up your sleeves, and then get to work. The applications are nearly limitless. Over to YouIf you sometimes find yourself lying in bed at night wondering, “how do I increase my blog traffic?”, I feel your pain. I did my best to stay away from the more common methods of blog promotion, so hopefully you found something new to try. Of course, not all of the tactics we discussed will be suitable for, or will work for, your blog and your particular niche. You’ll need to experiment and find what works for you. When it comes down to it, marketing is always about experimenting — experimenting, failing, and going at it again and again until you succeed. Now, go forth and get that traffic! The post How to Promote Your Blog in 2019: 9 Creative Strategies appeared first on Smart Blogger. from https://smartblogger.com/how-to-promote-your-blog/
0 Comments
from Twitter https://twitter.com/MyDMEOnline from https://mydmeonline.tumblr.com/post/183918367206
from Twitter https://twitter.com/MyDMEOnline from https://mydmeonline.tumblr.com/post/183895377126
Looking for a tutorial showing you how to install WordPress, but keep finding resources that tackle every method except the one you need? We’ve got your back. In this post, we break down every conceivable way there is to install WordPress. You’ll learn how to install WordPress using cPanel, Softaculous, MOJO, Fantastico, and QuickInstall; locally on both Windows and Mac; manually using FTP; and we’ll break down popular hosting providers like GoDaddy, Bluehost, and HostGator. You’ll also learn how to install WordPress Multisite, how to install WordPress in different languages, and more. Just click the appropriate link in our Table of Contents to jump to the section you need. Ready? Let’s go. Table of Contents
How to Install WordPress on cPanel (Softaculous, MOJO, Fantastico, and QuickInstall)So, you decided to start a blog. Awesome. Now it’s time to roll up your sleeves and get to work installing WordPress. Thankfully, many of the popular WordPress hosts offer some form of simplified (or even automatic) installation. If you’re using a “shared†WordPress hosting plan, there’s a good chance your host will use cPanel.
Editor’s Note: cPanel is an online control panel many web hosts use to simplify the whole “how to host a website†thing for users. Go here to learn more about it.
Let’s walk through the cPanel process… Step #1. Find Out How to Access Your Host’s cPanelUnfortunately, the way you get to cPanel is not standardized across the web. Different hosts access it differently. So, before you can do anything, you need to find out how to access your host’s cPanel. The easiest method is to find the emails your hosting provider sent you when you signed up for your account. Among other valuable bits of information, the URL to your cPanel will be in one of those initial emails. But if you can’t find the right email, don’t worry. Just Google the name of your web host and “cPanel loginâ€. That should do the trick. Step #2. Get to Know cPanelThe main cPanel dashboard can be a little intimidating. 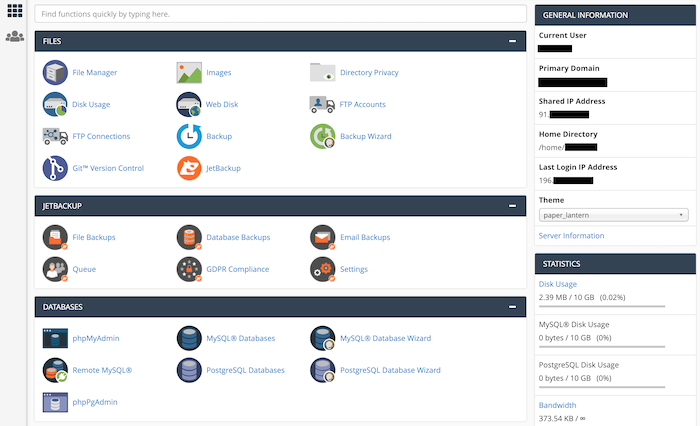 Relax. You don’t have to understand all cPanel has to offer. We’re here to do one thing — learn how to install WordPress. For that, let’s look for the cPanel installer tools, which are usually located near the bottom of the page. Your host might be using any of the following installers: Softaculous, Fantastico, QuickInstall, or MOJO Marketplace. We’re going to focus on Softaculous since it’s the most popular. But don’t worry if your host uses a different installer. While the specific interfaces might be a bit different, the idea behind every installer is the same. Plus, they all ask you for the same set of data and inputs. Step #3. How to Install WordPress Using SoftaculousTo begin, look for the Softaculous section in cPanel.  Click on the WordPress logo. The installer tool will open: Click on the Install Now button to begin the installation process. Softaculous needs only a handful of details from you. Here are the fields you should pay special attention to:
Here’s what the form looks like: 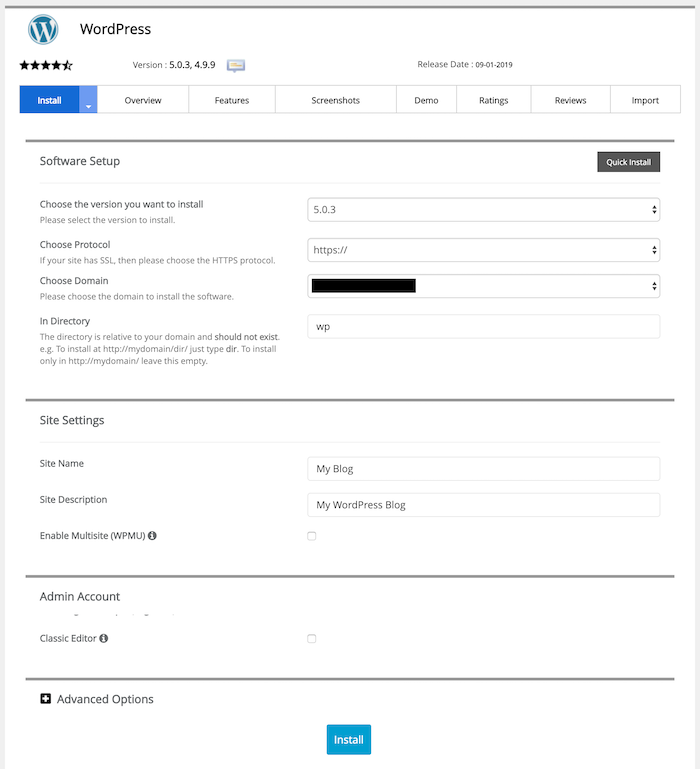 Click Install to proceed. When the process finishes, Softaculous will show you a final confirmation screen along with links to your WordPress dashboard. And that’s it! You’ve installed WordPress using cPanel.
Note: The WordPress dashboard of your newly-installed site should be available at yoursite.com/wp-admin/.
How to Install WordPress on Localhost (Or, How to Install WordPress Locally)The instructions for how to install WordPress locally depends on whether you’re using a PC (Windows) or a Mac. We’ll go over both methods. First up: Windows. (If you’re on a Mac, click here to jump ahead.) How to Install WordPress on WindowsWordPress is a great tool for local web development. Here’s how you install WordPress locally on Windows: Step #1. Get XAMPPXAMPP is a local web server for your computer. It’s an all-in-one package with everything you will need to run software (such as WordPress) locally.
What About WAMP?
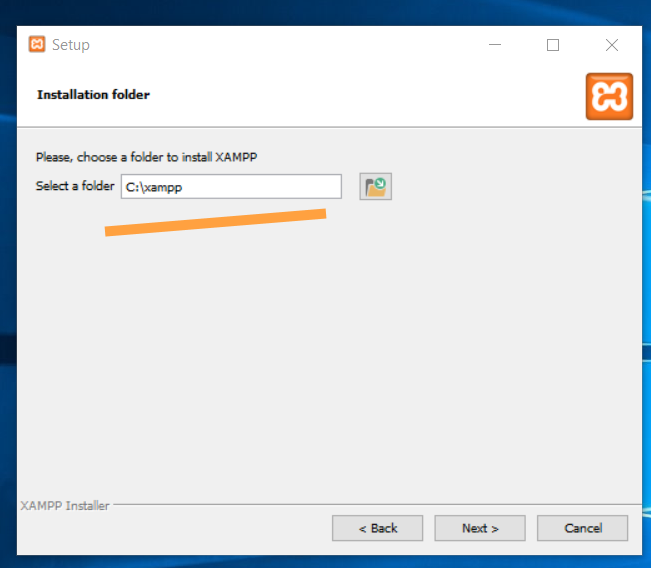
You might have heard of a similar tool called WAMP. Under the hood, WAMP and XAMPP do the same thing. However, in my opinion, WAMP isn’t as reliable as XAMPP. For this reason and others, we’ll focus on XAMPP in this tutorial. 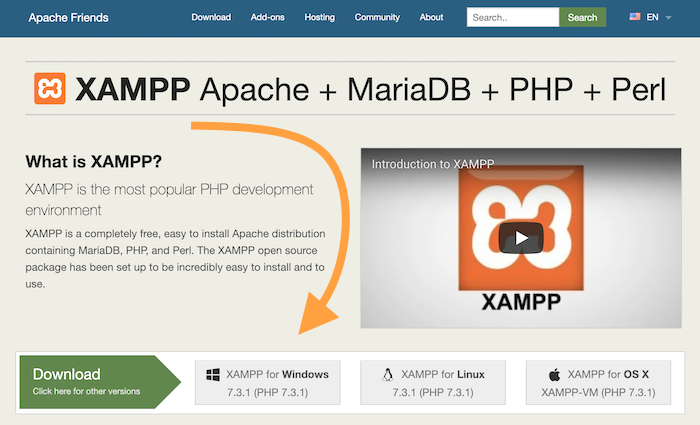 From the XAMPP website, click on the download button for Windows and save the XAMPP package to your desktop. Launch the XAMPP installer and follow the prompts on the screen. First, select the individual components you want to have installed. To be safe, you can choose all of them: 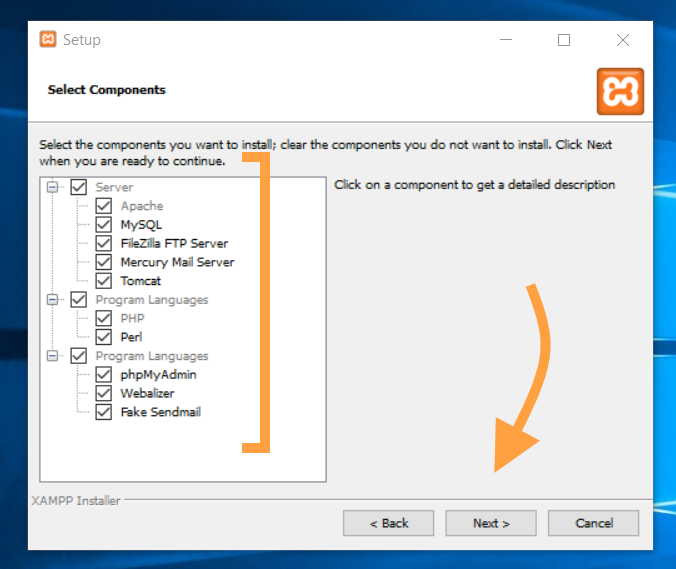 Next, select the installation folder for XAMPP.
Note: Avoid installing XAMPP in Program Files. The read/write restrictions of Windows might prevent it from working correctly. Installing in C:\xampp is a safer bet.
 XAMPP will take a minute or two to install. When it’s finished, you’ll see this confirmation screen: 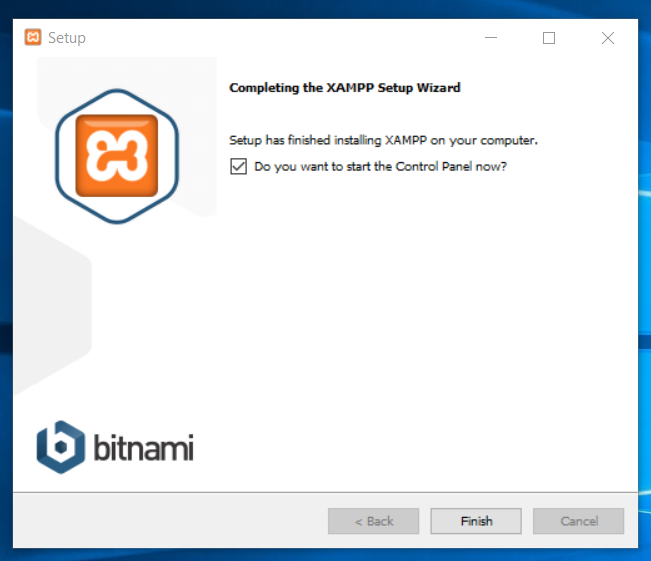 When you click on Finish, you’ll see the main XAMPP config panel. In it, click on the two Start buttons next to Apache and MySQL. Like so:  You should see the two labels change to green: 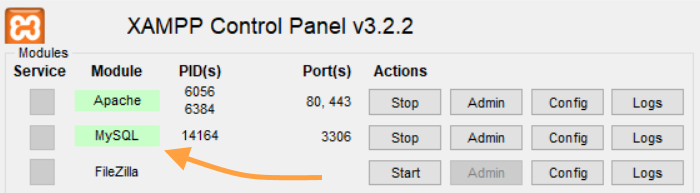 When you see green, your local server is working! Step #2. Create a Blank Database for WordPressFrom the control panel of XAMPP, click on the Admin button in the MySQL row:  This will launch a tool called PHPMyAdmin, which is an open-source database management tool. 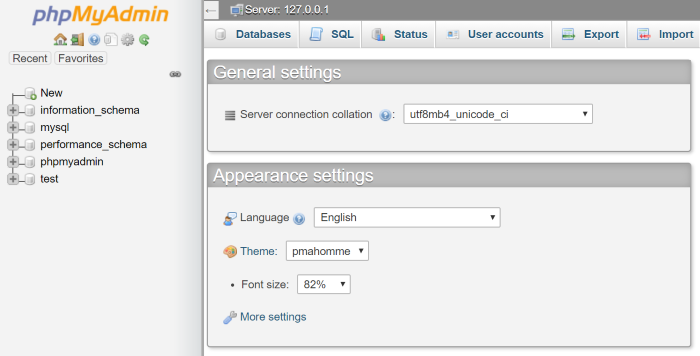 Go into Databases (from the top menu).  Enter a name for your new WordPress database (something simple) and click the Create button: 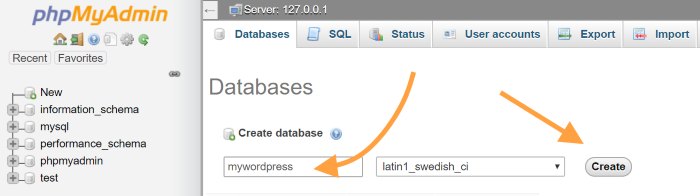 You should see your new blank database in the sidebar: 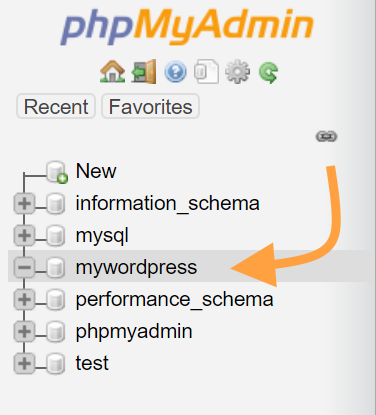 You can now exit PHPMyAdmin. Step #3. Download WordPressGo toWordPress.org and download the most recent version of the software. Don’t worry. It’s free: 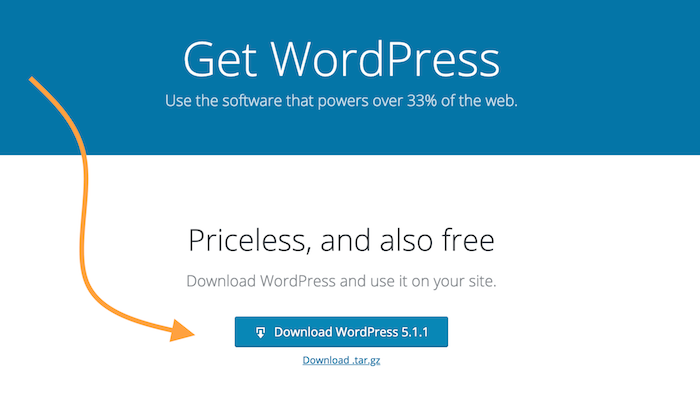 Next:
Note: The name of this folder will also become part of the local address of the site. With mynewsite being the folder name, the address of the site is going to be localhost/mynewsite.
Take the contents of the WordPress archive and move them to this new subfolder (“mynewsite†or whatever you named yours). It should look like this: 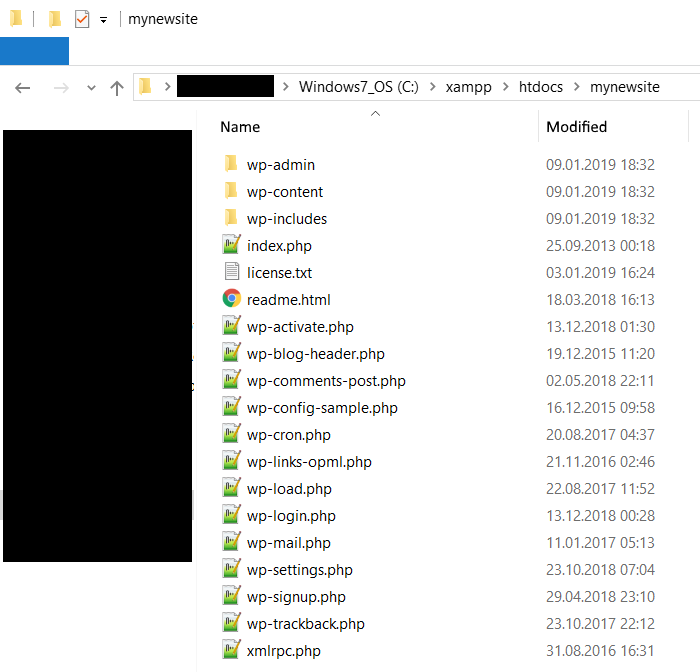 Step #4. Install WordPress Locally on WindowsOpen your web browser and navigate to localhost/mynewsite. What you’ll see is the on-screen WordPress Installation Wizard. The first step is choosing your language: 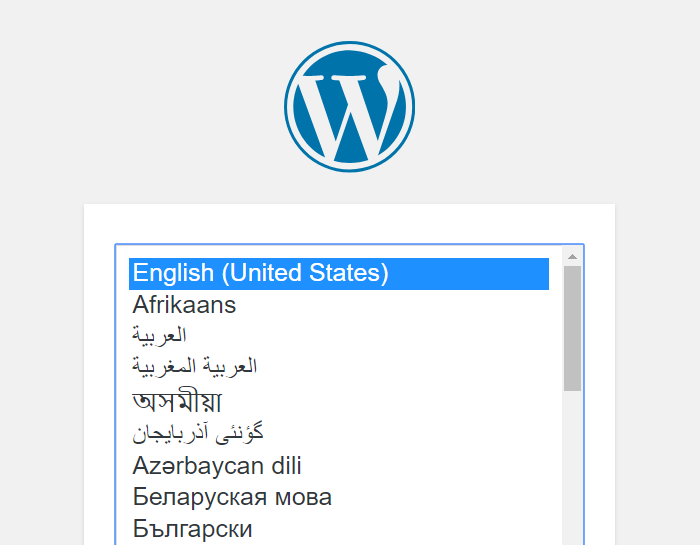 The next screen is an info card to get you up to speed with what’s going to happen. Click on Let’s go! once you’ve read it. The next step is a crucial one in the installation. This is where you get to enter the details of your WordPress connection to the database. Here are my settings based on everything I’ve set in the previous steps so far: 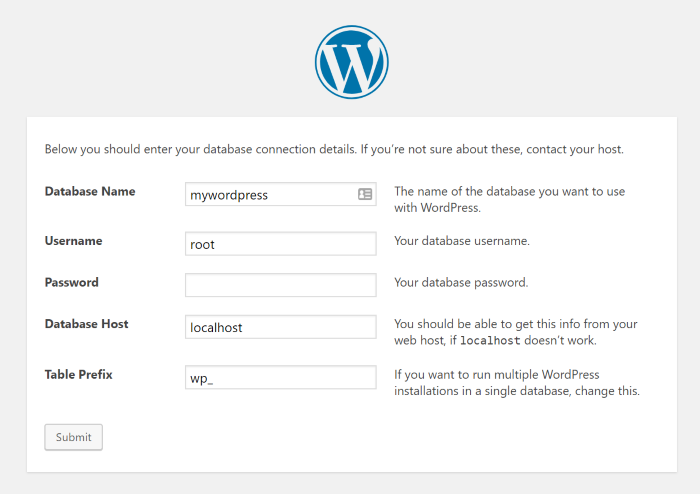 Important parts:
The next step is where you get to set the name of your site and the details of your main admin account: 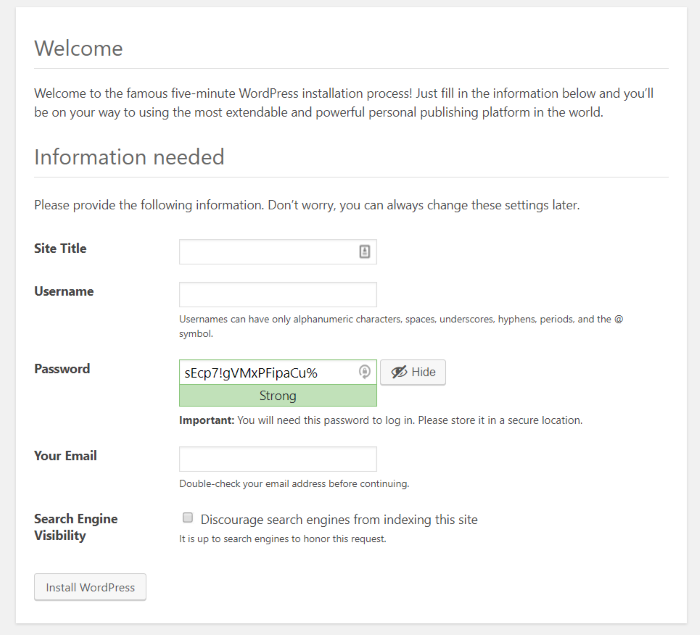
Note: With the exception of username, you’ll be able to easily change these later in your WordPress dashboard.
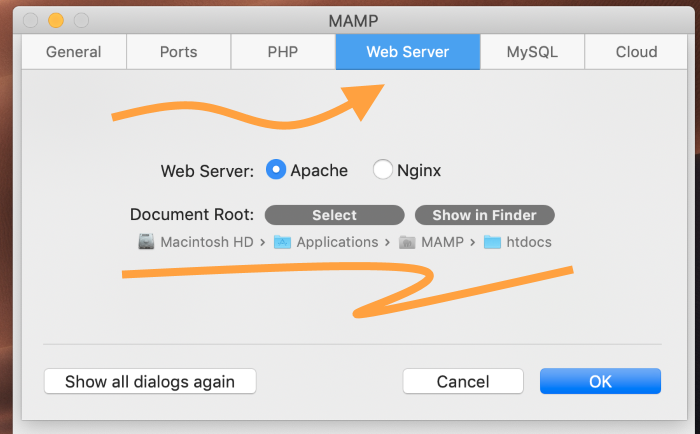
Click on Install WordPress to finalize everything. And that’s it. You’ve installed WordPress locally on Windows. How to Install WordPress on MacWhile installing WordPress locally on Mac isn’t the usual “get app from App Store†experience we’re used to, it can still be done with relative ease. Here’s how to install WordPress on Mac: Step #1. Get MAMPMAMP is a local web server that works quite well on Mac. (It’s also easier to install than some of its alternatives.). 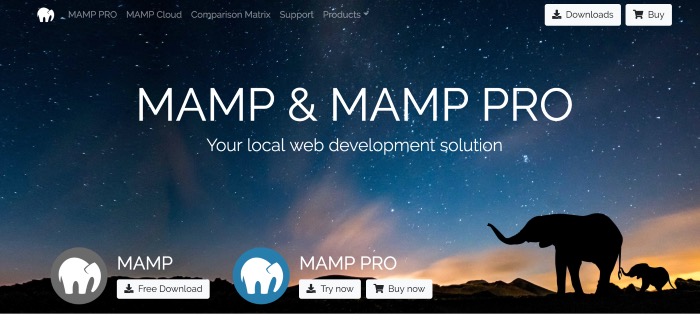 From the MAMP website, go to the downloads section and choose the option for macOS: 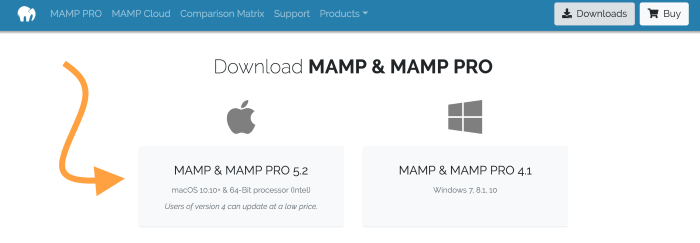 Save the package to your computer. Launch the MAMP installer and proceed through the on-screen wizard. 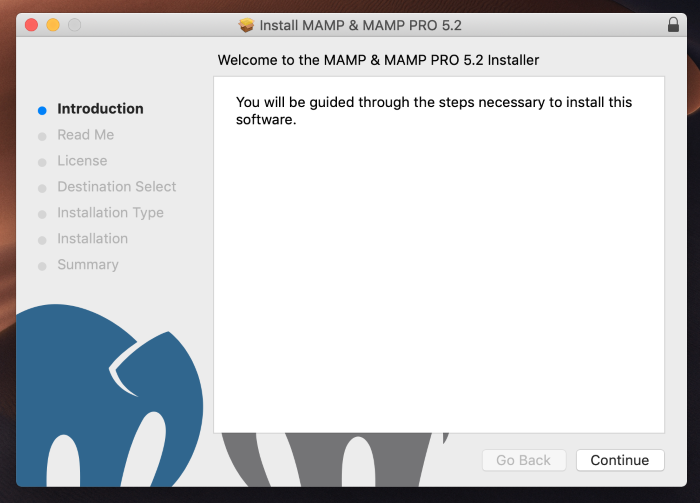 When the installation finishes, open MAMP from Mac’s Launchpad. In the config panel, click on the main Start Servers button. 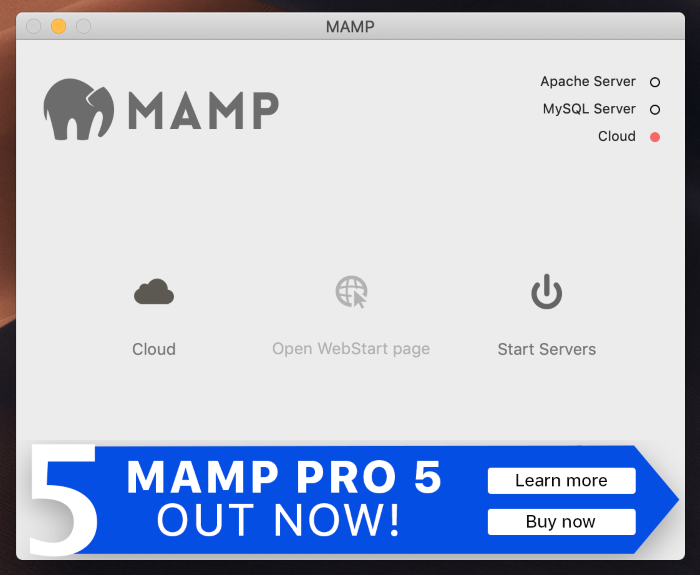 Congrats! Your local server is working. Step #2. Create a Blank Database for WordPressAs soon as you start your server in MAMP, you will be taken to the server’s homepage. Usually, it’s “http://localhost:8888/MAMP/†(without the quotes). From there, click on PHPMYADMIN under TOOLS: 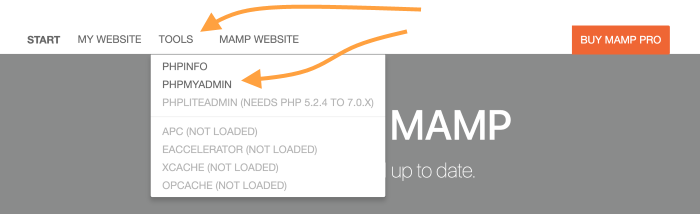 As mentioned earlier in the post, PHPMyAdmin is a handy, open-source database management tool. We use it to create a new database for WordPress. 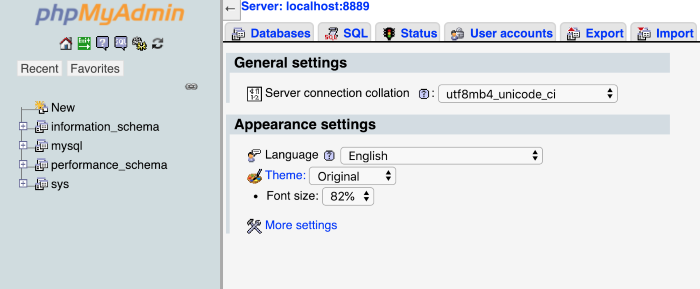 Go into Databases (from the top menu):  Enter a name for your new WordPress database (something simple) and click on Create. Like so: 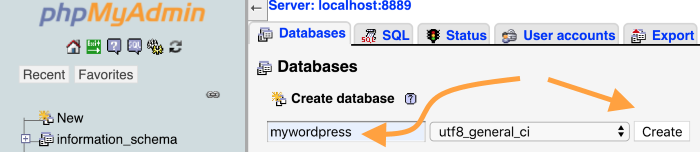 You should see your new blank database in the sidebar. 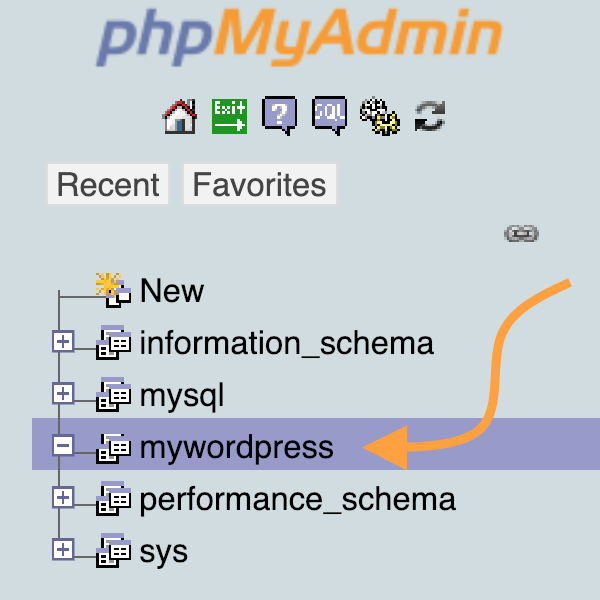 You can now exit PHPMyAdmin. Step #3. Download WordPressGo to WordPress.org and download the most recent version of the software. Next:
Note: The name of this folder will also be part of the local address of the site. With mynewsite being the folder name, the address of the site is going to be localhost:8888/mynewsite.
Take the contents of the WordPress archive and move them to the new folder you created. It should look like this: 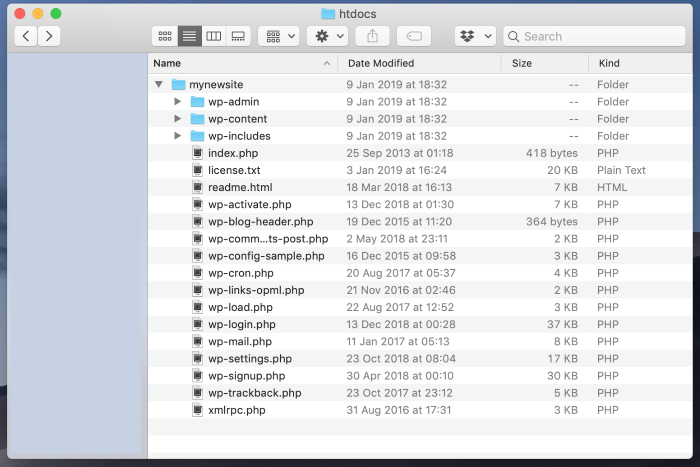 Step #4. Install WordPress Locally on MacOpen your web browser and go to localhost:8888/mynewsite. What you’ll see is the on-screen WordPress installation wizard. The first step is choosing your language: The next screen is an info card to get you up to speed with what’s going to happen. Click Let’s go! once you’ve read it. In the next step, you will enter the details of your WordPress connection to the database. Here are my settings based on everything I’ve set in the previous steps: 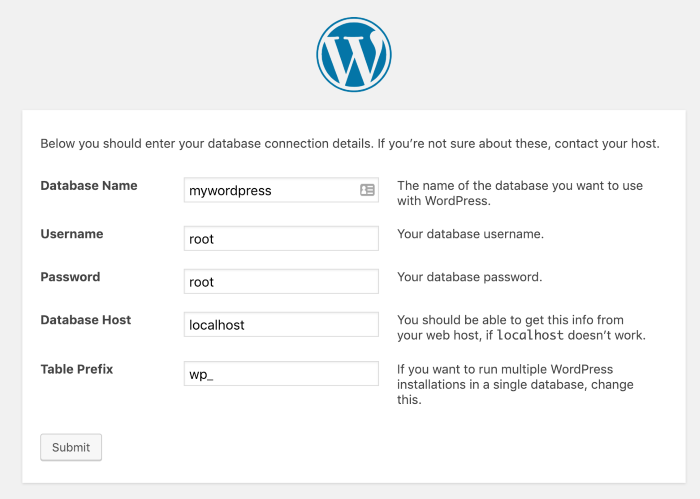 Important parts:
The next step is where you get to set the name of your site and the details of your main admin account:
Note: With the exception of username, you’ll be able to easily change these later in your WordPress dashboard.
Click on Install WordPress to finalize everything. And that’s it. You’ve installed WordPress locally on a Mac How to Install WordPress via FTP (Or, How to Install WordPress Manually)Installing WordPress via FTP takes only minutes, but you do need to have a couple of things ready beforehand. Chiefly, you need to have access to a web server — aka, a web hosting account.
Editor’s Note: Two WordPress hosting options we recommend to our Smart Blogger students are SiteGround (affiliate link) and WP Engine (affiliate link). Both are great options.
Start by going to your host of choice and purchasing one of the available web hosting plans. If you already have a web host, you’re ahead of the game! Next: Step #1. Download WordPressGo to WordPress.org and download the latest version of WordPress. Save the package to your computer and extract its contents. Step #2. Upload WordPress Files to Your ServerThe next step involves connecting to your web server via FTP and uploading your just-downloaded WordPress files. You’re going to need to use a third-party FTP tool to do that. FileZilla is a popular one. We’ll use it for the purposes of this demo. Now, in order to connect to your server, you’ll need your connection details. This information should have been provided via email when you first signed up for your hosting account. But if you can’t find it, no worries. You can find your FTP information inside your host’s cPanel. Go to the FTP Accounts section (under FILES): 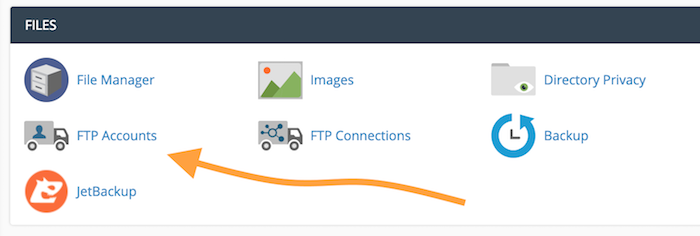 You’ll find your FTP accounts there. Or, alternatively, you can create your FTP account if one doesn’t already exist. Next to your FTP account, there’s a link labeled Configure FTP Client. Click on it:  This will reveal a new section. In it, click on the FTP Configuration File button under FileZilla: 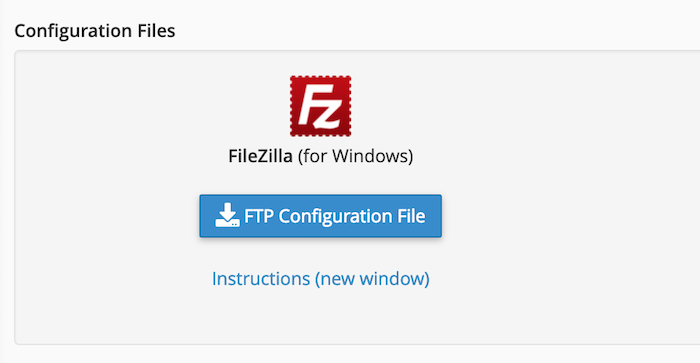 You can open that file with FileZilla and set up your connection details immediately. With that done, the only thing left to do is upload your WordPress files to the server. Depending on your hosting setup, you might need to upload WordPress to a specific directory. However, for most users the directory will be called public_html or public_www. If in doubt, verify with your web host. Step #3. Create a New Database for WordPress in cPanelWordPress, just like any other modern CMS, cannot work without a database. The database is where all your posts, pages, comments, and other site content are kept. To create a new database, go back to cPanel, scroll down to the DATABASES section, and click on MySQL Database Wizard: 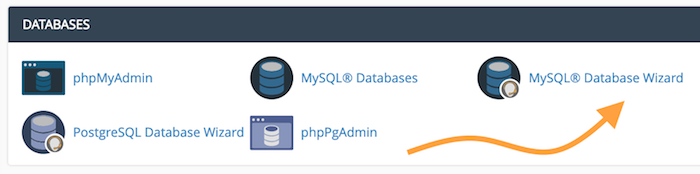 From there, you’ll be guided through the steps to create a new database. First, pick a name for your database: 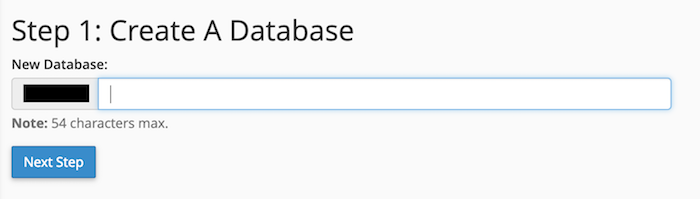 Next, create a new user account that WordPress will use to access the database. 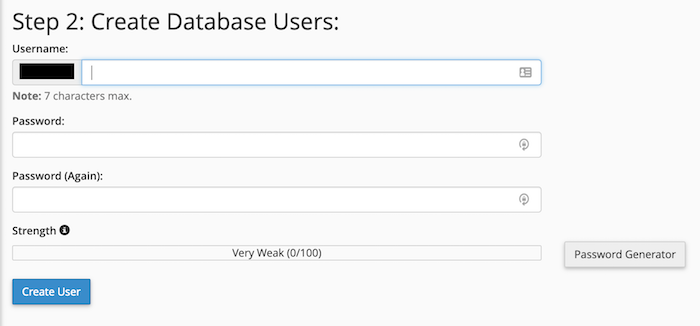
Note: Be sure to jot down the username and the password. You’ll need them in the next step.
Lastly, assign sufficient access rights to the new user account. It’s best to do that by simply selecting ALL PRIVILEGES, like so: 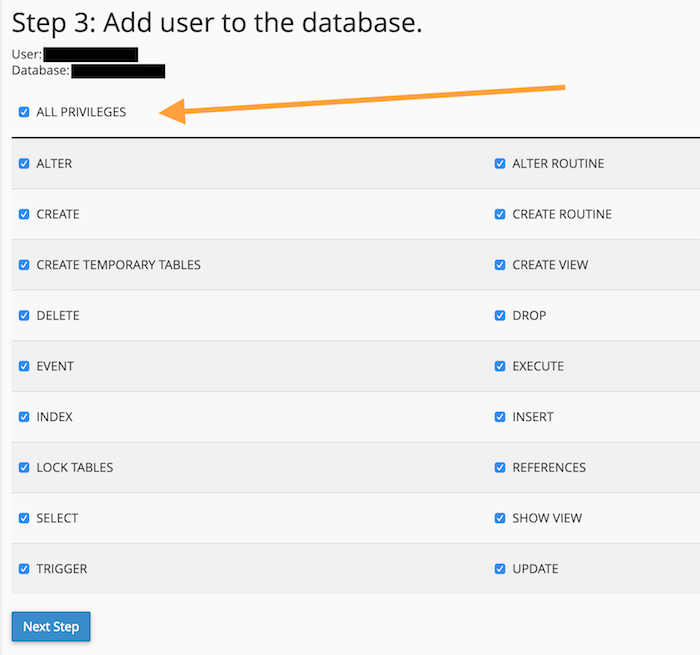 Your database setup is now complete! Step #4. Install WordPress Through the Online InstallerThis is the last step on your journey to getting WordPress installed via FTP. Simply fire up your browser and navigate to your site’s URL. You’ll see the main page of the WordPress installer. First, choose the language of your site: The next step is a crucial one, and it’s where you’ll need to provide your database details. (Hopefully you jotted those details down earlier!) 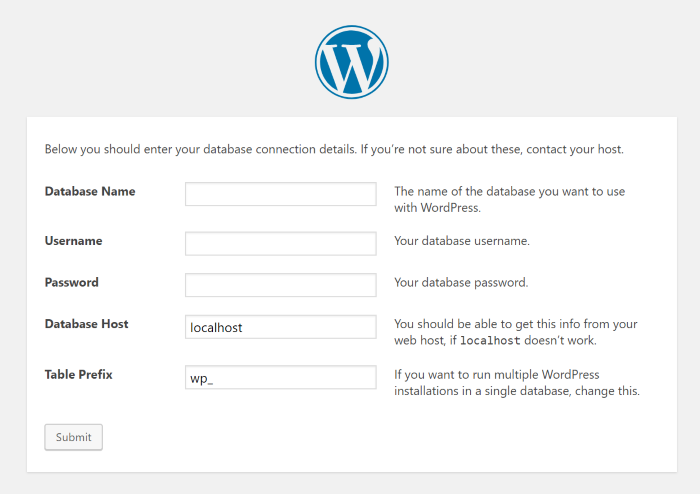 Here’s a breakdown for each:
The next step is where you get to set the name of your site and the details of your main admin account:
Note: With the exception of username, you’ll be able to easily change these later in your WordPress dashboard.
Click on Install WordPress to finalize everything. And that’s it! You’ve successfully installed WordPress manually using FTP. How to Install WordPress MultisiteWordPress Multisite is an interesting feature built into WordPress. Simply speaking, with WordPress Multisite, you can launch multiple WordPress websites, all working on the same WordPress install. This is great for businesses and organizations that need multiple websites, but want to keep the cost of managing them low. WordPress Multisite is also a great choice for universities where it’s very common for individual courses or teachers to have their own sites. Here’s how to set up and install WordPress Multisite: Step #1. Install WordPress Locally, via cPanel, or via FTPTo begin your journey with WordPress Multisite, you first need to install WordPress using any of the methods described earlier in this guide. Go here to install WordPress locally on Windows or here to install WordPress locally on a Mac. Finally, go here to install WordPress using FTP. Once you’ve installed WordPress, you’re ready for the next step. Step #2. Enable WordPress MultisiteConnect to your server via FTP (explained previously in this guide), and download the wp-config.php file from your main WordPress directory. Open the file in Notepad (or similar software) and add the following line at the bottom: define (‘WP_ALLOW_MULTISITE’, true); Save the file and re-upload it to your main WordPress directory via FTP. You’ll want to overwrite the original file. Step #3. Set up Your WordPress Multisite NetworkAt this stage, WordPress is ready to let you configure your network of sites. Here’s how: First, go to your plugins and deactivate all of them.  Next, go to Tools > Network Setup. This is where you create your network of WordPress sites. 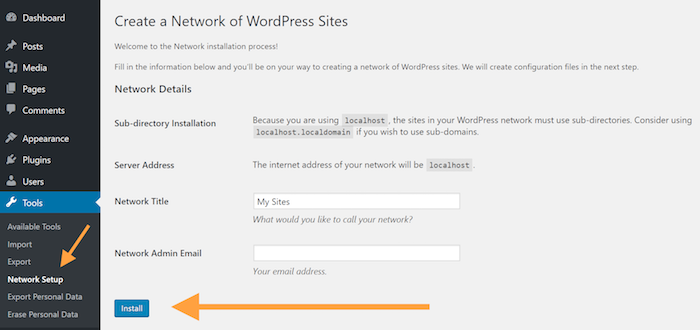 Click on the Install button to begin. On the next screen, WordPress will give you specific instructions for finalizing the setup. 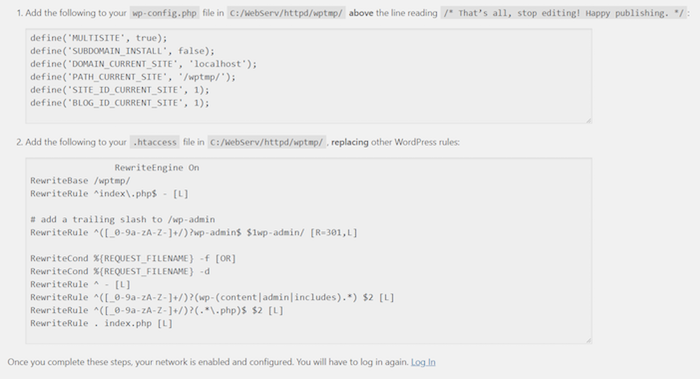 This will involve editing two files in your WordPress directory (similarly to how we did it a minute ago with wp-config.php). Example setup: Step #4. Create your WordPress Multisite SitesOnce you log back into WordPress, you’ll see an updated version of the admin interface with one new section in the top left corner:  This menu is where you can switch between your WordPress sites (and where you can add new sites to the network). Each website is independent, can feature different content, different user accounts, different themes, different plugins, and so on. Congrats! You’ve successfully set up WordPress Multisite. (Feel free to re-activate all your plugins!) How to Install WordPress in Your LanguageDid you know WordPress has been translated into 113 (and counting) languages? It’s true. You can install WordPress in everything from Afrikaans (South Africa) to 香港ä¸æ–‡ç‰ˆ (Simplified Chinese). In short: You can install WordPress in your language, no matter what that language might be. Here’s how to do it: #1. Download WordPress in Your LanguageGo to WordPress.org. Since WordPress is quite predictive and helpful with international users, based on your location, you’ll see a note encouraging you to download WordPress in your language. Here’s an example: 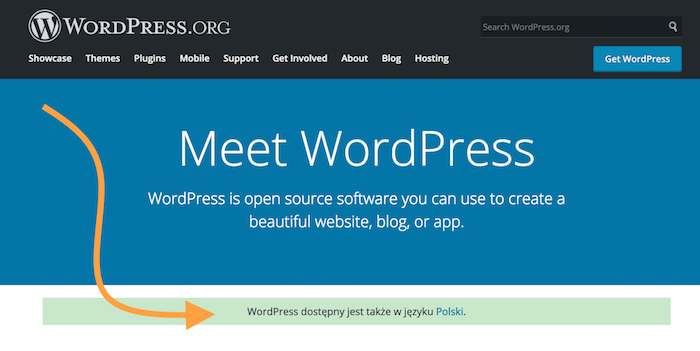 What the above box says is: “WordPress is also available in Polish.†When you click on the language — in this example, “Polski†— you’ll get redirected to a new, localized WordPress website. Once there, download the WordPress package and save the ZIP file to your desktop and extract its contents. #2. Install WordPress via FTPNext, follow the same instructions we discussed earlier in this guide. Click here to jump to Upload WordPress Files to Your Server. Bonus Tip: Installing Language Files from the Admin DashboardIf you’ve already installed WordPress in one language, but you’d like to use a different language, don’t fret. WordPress makes switching your language a breeze. In your Dashboard, go to Settings > General > Site Language. Then simply choose the language you’d like to use. And that’s it! You’re done. How to Install WordPress on 12 Popular Web HostsThe following section covers how to install WordPress on 12 popular hosting providers. Click on a link below to jump to your host:
How to Install WordPress on SiteGroundSiteGround (affiliate link) offers a cool wizard tool to get your WordPress installed in minutes. There’s no need to deal with any coding, settings, or uploading things a server. Here’s a video showing you the process: 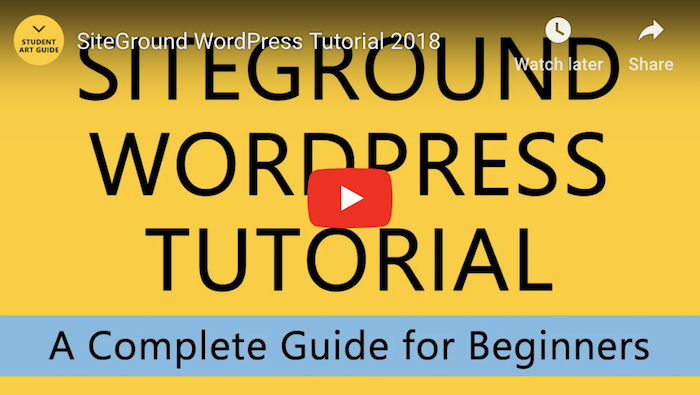
But, if you prefer written instructions, here are the steps: When you log into your SiteGround user panel for the first time, you’ll be greeted by a message asking if you’d like to have a new website set up for you: 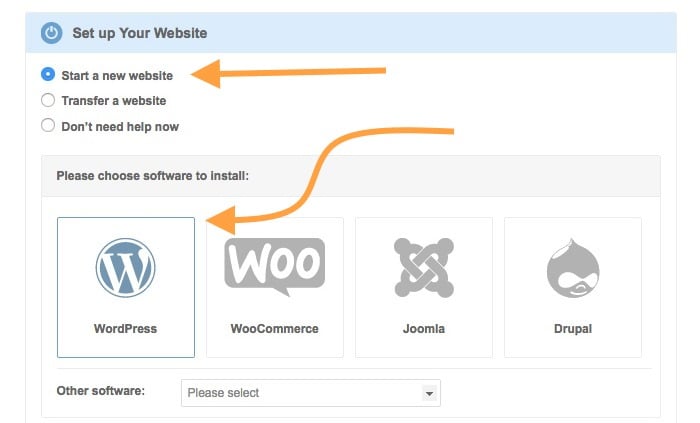 Click on the option labeled “Start a new website†and select WordPress as your platform. SiteGround will also create a new admin account for you. All you need to do is provide the login details: 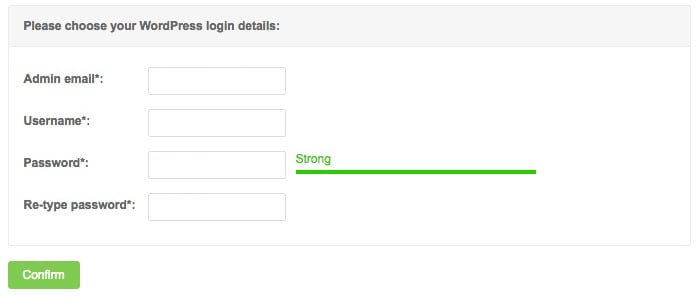 That’s all there is to it. How to Install WordPress on BluehostWhen you sign up for a Bluehost WordPress Hosting plan, the latest version of WordPress is installed automatically for you. All you have to do is configure it. Here are the steps: 
If you’d like to set up additional WordPress sites, it’s easy to do so via the Bluehost dashboard. Go to My Sites, and then click on Create a Site. 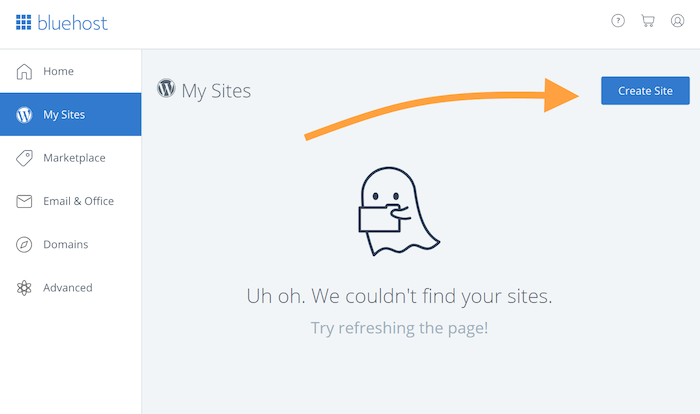 Enter your site details and proceed through the individual screens. First, you’ll need to pick a name for your WordPress installation: 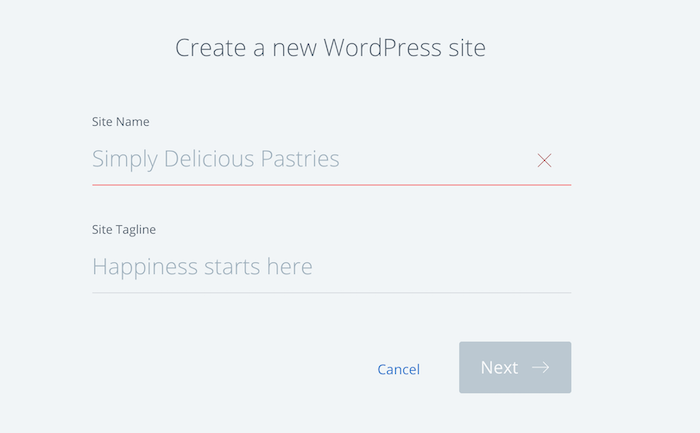 You will then enter the domain name and directory, plus any optional plugins you might want: 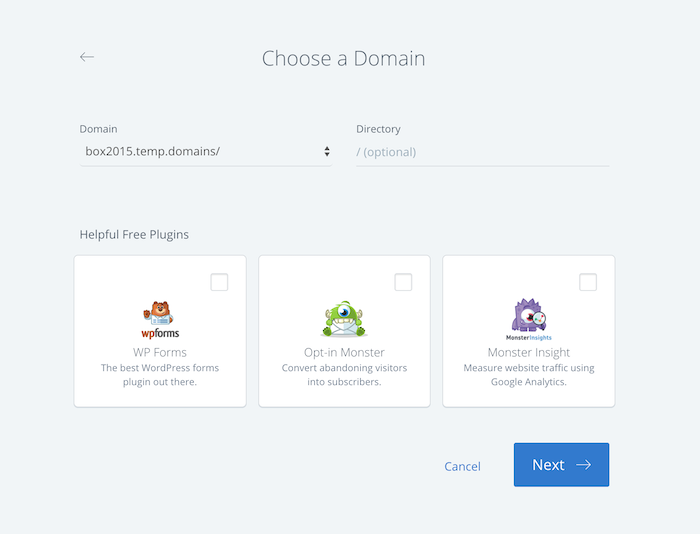 Finally, set your admin user login and password. How to Install WordPress on GoDaddyGoDaddy uses cPanel for installing WordPress on their hosting plans. Here’s their official video walking you through the entire (simple) process: 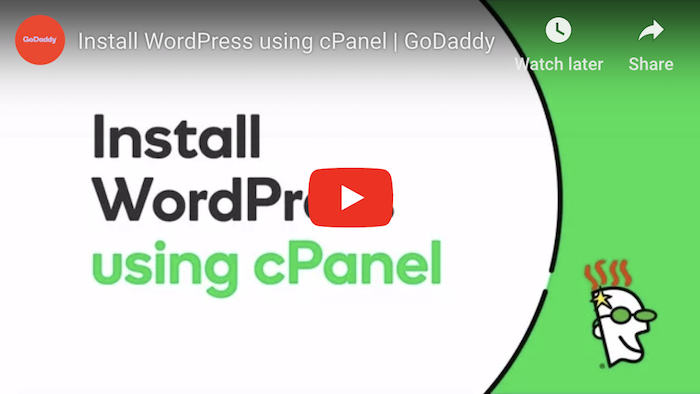
And if you need to add another WordPress site, that’s easy too. Log into your GoDaddy user panel, go to Managed WordPress > Manage All. Click Add Site. 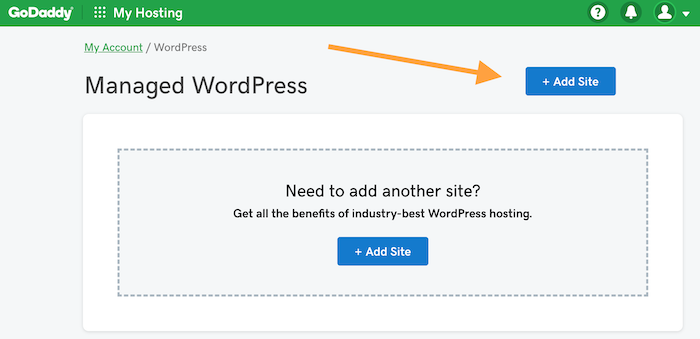 From this point on, GoDaddy will take you by the hand and do most of the work for you. All you’ll need to do is enter a name for your site and your desired login credentials for the admin user. When the installation finishes, GoDaddy will show you a WordPress Setup Wizard to help you customize your site: 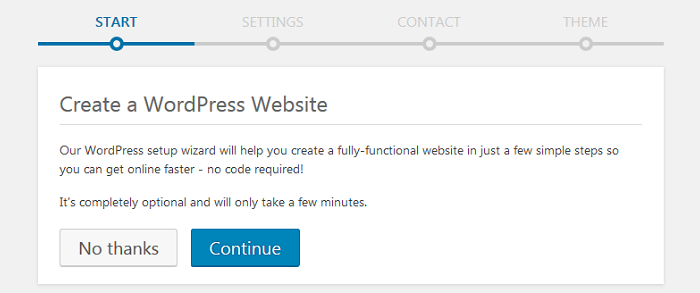 You can click No thanks or Continue. How to Install WordPress on WP EngineWP Engine (affiliate link) is one of the original “managed†WordPress hosting platforms. They handle all the technical heavy lifting for you, so you can focus on what’s important for your website’s success. What this means in practice is WP Engine will install WordPress for you when you create an account. You don’t have to lift a finger. You access the site from your user panel: 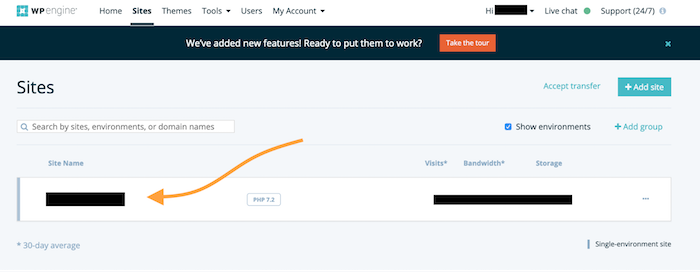 If you want to add additional sites to your WP Engine setup, it’s pretty easy. Here’s a video tutorial showing you how: 
If you prefer written instructions, here’s WP Engine’s official guide for adding or deleting WordPress installs. How to Install WordPress on FlywheelLike WP Engine, Flywheel is a managed WordPress hosting platform. They take care of the technical aspects — including installing WordPress — for you. All you have to do is provide a few pieces of info. Here’s a video walking you through the process: 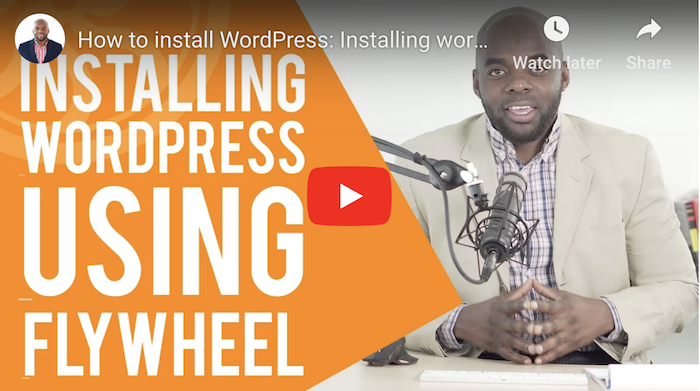
If you would like to create additional sites, from your user profile click the Create a New Site button: 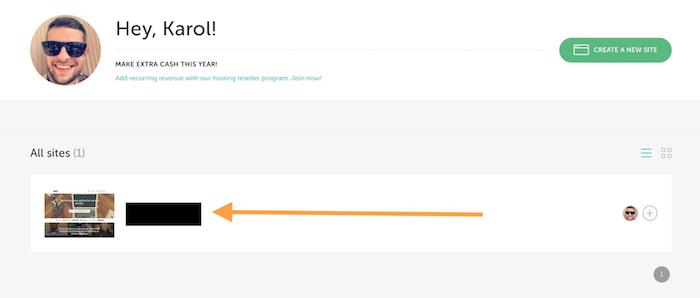 Next, provide all the necessary details such as site name, admin user login, password, and your preferred payment method. 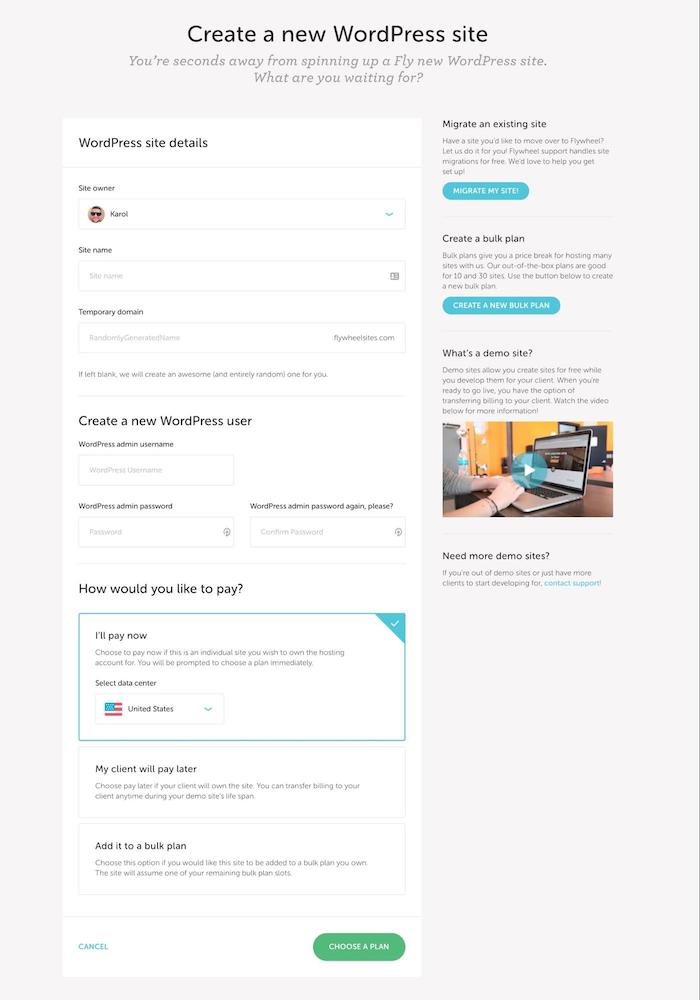 Once you’ve completed the form, your site will become visible in your user profile. That’s all there is to it. Here’s Flywheel’s official guide for adding new sites if you need more information. How to Install WordPress on KinstaKinsta is a newcomer to the managed WordPress hosting market. Like WP Engine and Flywheel, Kinsta installs WordPress for you when you create your account. If you’d like to add additional WordPress sites to your Kinsta plan, follow the steps in this video: 
If you prefer written instructions, here’s Kinsta’s official guide for adding WordPress sites. How to Install WordPress on HostGatorLike many shared WordPress hosts, HostGator gives you access to cPanel. With it, you can easily install WordPress using the steps in the video below: 
Can’t play the video? No worries. HostGator also offers an extensive how-to article for installing WordPress on their platform. How to Install WordPress on DreamHostFor each of their WordPress hosting plans, DreamHost provides WordPress pre-installed. All the work is done for you. If you’d like to add additional WordPress sites, here’s a video showing you how it’s done: 
Prefer written instructions? Here is Dreamhost’s how-to article for using their handy 1-Click WordPress Install. How to Install WordPress on A2HostingA2Hosting offers both shared and managed WordPress hosting. For shared hosting, they offer 1-Click WordPress installation using Softaculous. Here’s a video to walk you through the steps: 
If you opt for one of their managed hosting plans, WordPress will come pre-installed with your A2Hosting account. If you’d like to add more WordPress installs to your account, here’s the official A2Hosting video to show you how: 
How to Install WordPress on InMotion HostingLike its managed-hosting competitors, InMotion Hosting provides pre-installed WordPress on your hosting account from the get-go. This means that you don’t need to install WordPress on your own. If you’d like to install WordPress on an add-on domain, InMotion offers this handy tutorial video: 
How to Install WordPress on iPageJust like other “managed†WordPress hosting companies, iPage provides WordPress pre-installed with your account. (You also get a set of pre-installed WordPress themes and plugins.) Here’s a helpful video showing you how to configure your iPage WordPress site: 
If you need to install some additional WordPress sites on iPage, click here to read their guide. How to Install WordPress on HostingerHostinger offers a quick-and-easy auto installer for WordPress. Here’s their official video showing you how it’s done: 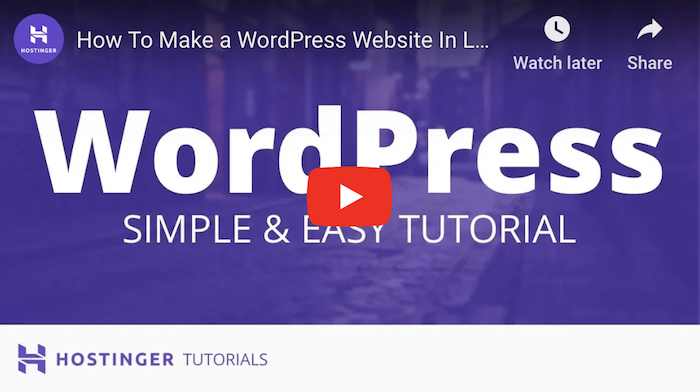
If you prefer written directions, here’s Hostinger’s tutorial for installing WordPress (using various methods). Frequently Asked QuestionsBefore we wrap things up, let’s go over a few common, related questions we often hear: Do I Need to Install WordPress?Answer: It depends. If you use a “managed†web host like WP Engine, installing WordPress is taken care of for you. You don’t have to do anything (beyond filling in a few pieces of information). However, if you’re using a “shared†hosting plan, you’ll need to install WordPress. The good news is that most web hosts have made the process easy. A few clicks and you’re finished.
Editor’s Note: This is all assuming, of course, you want a WordPress site. WordPress is awesome, but it’s not the only game in town — there are many blogging platforms out there.
Does WordPress Cost Money?No, the WordPress software is 100% free. Anyone can go to WordPress.org and download it for free at any time. The typical costs for running a WordPress website come from other factors, such as purchasing a domain name and choosing a hosting provider. Does WordPress Include Hosting? (Or, Does WordPress Host Your Site?)If you’re using WordPress.com, the answer is yes. WordPress.com is a free, hosted version of the WordPress software offered by the company. (You can upgrade to various paid plans if you need more features.) However, if you’re using the self-hosted version of the software available for free at WordPress.org, the answer is no. You’ll need a hosting provider. Which Hosting is Best for WordPress?WordPress.org officially recommends Bluehost, DreamHost, and SiteGround. At Smart Blogger, we recommend SiteGround (affiliate link) and WP Engine (affiliate link). Since SiteGround is on both lists, it’s safe to say it’s a solid option. How to Install WordPress Themes?Your WordPress installation will come with several free themes (designs), but there are thousands of additional themes — both free and premium — you can add. Here’s a quick guide for how to install WordPress themes from inside your WordPress dashboard. How to Install WordPress Plugins?Though you have to be careful not to go overboard with them, WordPress plugins are one of the software’s best features — they allow you to add all sorts of functionality to your WordPress site that’s not available out of the box. SiteGround has published a helpful tutorial for how to install WordPress plugins if you would like step-by-step instructions. How to Install Facebook Pixel on WordPress?If you’re interested in running Facebook Ads (either now or in the future), you need to install a Facebook Pixel on your WordPress site. What’s a Facebook Pixel? It’s a piece of tracking code you add to your website that collects data whenever someone visits your site or takes a specific action. Here’s a video explaining it in more detail (including how to install it): If you prefer written instructions, here is Facebook’s help article on Facebook Pixel, which includes steps for creating and installing them. It’s Time to Install WordPressInstalling WordPress can be overwhelming — especially if you’ve never done it before. Hopefully, this in-depth guide has been able to point you in the right direction. Use it, bookmark it, and feel free to share it with a friend. And if there’s an installation method we missed, tweet us or let us know about it in the comments. We’ll happily add it.
About the Author: Karol K. (@carlosinho) is a WordPress figure-outer, blogger, and published author of WordPress Complete. His work has been featured all over the web on sites like: Ahrefs.com, Smashing Magazine, Adobe.com, CodeinWP.com, and others.
The post How to Install WordPress in 5 Minutes or Less (2019) appeared first on Smart Blogger. from https://smartblogger.com/how-to-install-wordpress/
from Twitter https://twitter.com/MyDMEOnline from https://mydmeonline.tumblr.com/post/183723377456
from Twitter https://twitter.com/MyDMEOnline from https://mydmeonline.tumblr.com/post/183723126451 Do you remember when you joined Twitter? I do! #MyTwitterAnniversary https://t.co/pHtG4aNjfr3/26/2019
from Twitter https://twitter.com/MyDMEOnline from https://mydmeonline.tumblr.com/post/183722516176 YES! You can do it! #marketing #DigitalMarketing #messengermarketing https://t.co/9MtYFKUUqG3/26/2019
from Twitter https://twitter.com/MyDMEOnline from https://mydmeonline.tumblr.com/post/183722225346
from Twitter https://twitter.com/MyDMEOnline from https://mydmeonline.tumblr.com/post/183703673081
from Twitter https://twitter.com/MyDMEOnline from https://mydmeonline.tumblr.com/post/183699054321 |


 RSS Feed
